The world of Biomutant is vast, and your little raccoon/cat/fox character has tiny little legs. Walking everywhere is an option, but it’s certainly not a convenient one. If you want to cover ground with a bit more style, you’re going to want some mounts and vehicles. Thankfully, Biomutant has a ton of them.
The first mount you encounter is likely to be either the Mekton, the Googlide, or one of the basic Gnoats of various colors, so I’ll walk you through the process of acquiring all of those. Beyond that, you can start collecting more types of Gnoats, such as the Pelago Gnoat and the Putignoat. And then, of course, you’ll get into things that fly and glide and whatnot. There are a lot of options, and I’ll explain every single one of them.
Note that some mounts can be found or purchased in multiple locations. I’ve not listed every single location here, but I do have at least one location for every ownable mount and vehicle in Biomutant.
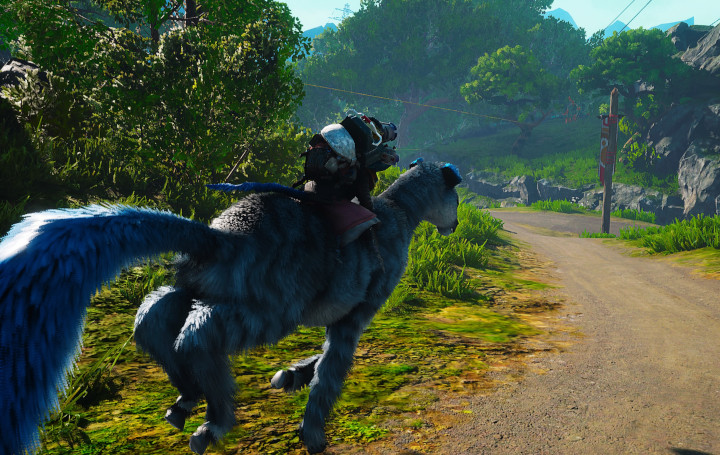
How to get the Azure Gnoat
After you’ve taken over your first outpost, you should encounter a quest called Life in the Wild, which will walk you through all of this, but I’ll give you the basic beats so you can go nab your mount ASAP.
Azure Gnoats can be found roaming around in the grassy areas in the southern portion of the map. In order to tame one, you’ll need to feed it a pip seed. So where can you find pip fruit (which contains the pip seeds you need)? Well, you’re looking for a bush that looks like this:
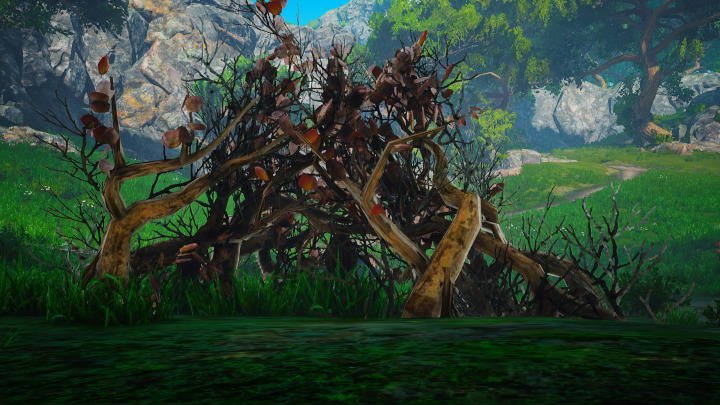
If you look closely, you’ll see a piece of fruit dangling on the underside of the bush. That’s a pip. To grab it, you’ll need to do a slide maneuver under the bush (activate this by running up to it and pressing the circle button if you’re playing on PS4).
I should point out here that different types of mount require different types of pips, but that there’s usually a pip bush of the correct type near any group of roaming Gnoats. You can see which pips you have by checking the Miscellaneous section of your inventory.
Once you have the pip, approach an Azure Gnoat and feed it. Hearts will appear over the Gnoat’s head and you’ll be able to mount it. Once you’ve ridden a Gnoat, it will be added to your inventory.
Here are two locations where you can find both pip fruit and Azure Gnoats:

Note that you can get multiple Azure Gnoats in your mount inventory. They all look exactly the same (as far as I can tell), but each will have a different name.
How to get the Mekton
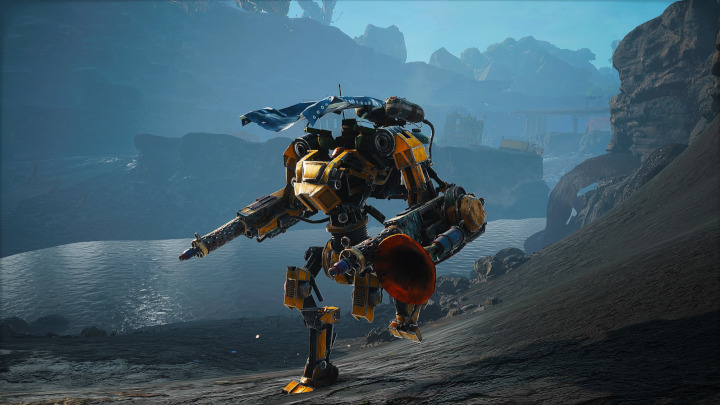
The Mekton is a bipedal mech suit that gives you access to the Deadzone. You might initially assume this would be a late-game mount (I certainly did), but you can actually pick it up within the first few hours of Biomutant. To acquire the Mekton, you’ll need to visit Gizmo, who you might remember from one of the early flashback sequences. Yes, he’s still alive and kickin’ it, and he’s got a mech suit for you if you can find him.
Gizmo is holed up in the tunnels beneath the Chugyard, which is virtually due north of the area where you enter the open world. It’s slightly to the northwest of Bricktown.
Gizmo needs you to reclaim some Mekton parts for him. Once you do that, he can repair it. After that, he’ll send you off on an errand into the Deadzone (you’ll have to meet Moog and collect a bunch of feisty critters called Sqvips — it’s a whole thing). In order to get to Moog, you’ll need to use the Mekton, and once you pilot it for the first time, it’s yours to keep.
You can also upgrade it by collecting Mekton Wrekboxes (there should be a quest called “The Mekton” that pops once you find your first Wrekbox, and it will guide you to all 14 locations). These upgrades allow you to customize the appearance of your Mekton.
How to get the Googlide
The Googlide is an aquatic craft that skims across the surface of the water (or goo, if you will). Acquiring it is pretty similar to acquiring the Mekton.
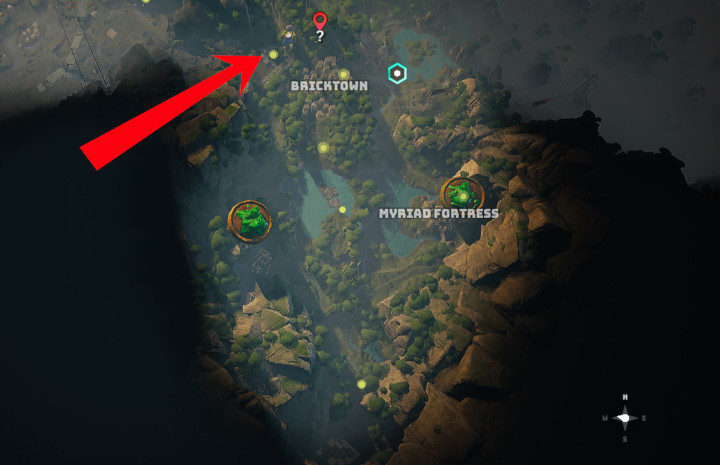
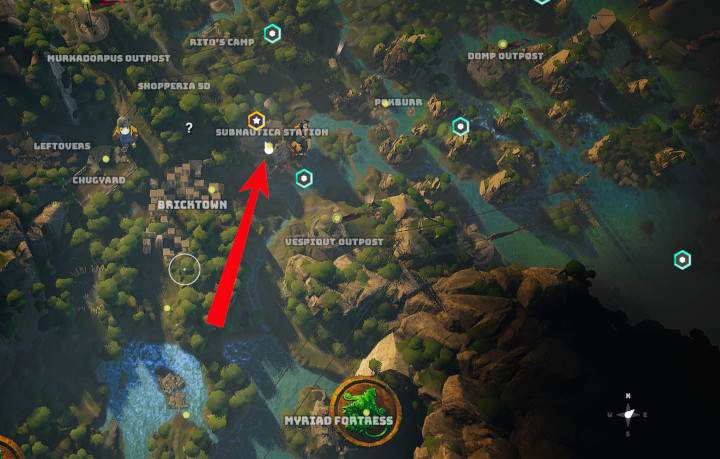
You’ll need to meet up with Goop at the Submautica Station (yes, he survived too!) Subnautica Station is north of Myriad Fortress and to the east of the Chugyard.
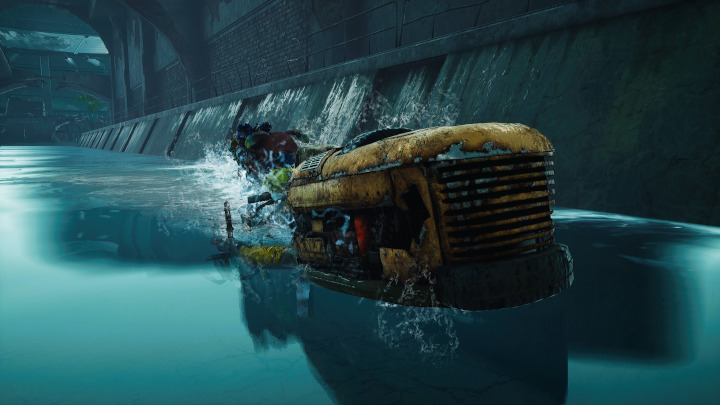
Goop will ask you to recover some Googlide parts in the sewers nearby. Once you bring him the parts, he can repair the Googlide, then he’ll send you off to chat with Gulp. The only way to reach Gulp is by water, so you’ll need the Googlide. Hop on it, and it’s all yours.
Just like the Mekton, you can upgrade the Googlide by collecting parts scattered across the world, only this time there are only 9 instead of 14. Plus, the engine upgrades are more than just cosmetic, as they’ll allow you to navigate the green and rust-colored water in the Surfipelago.
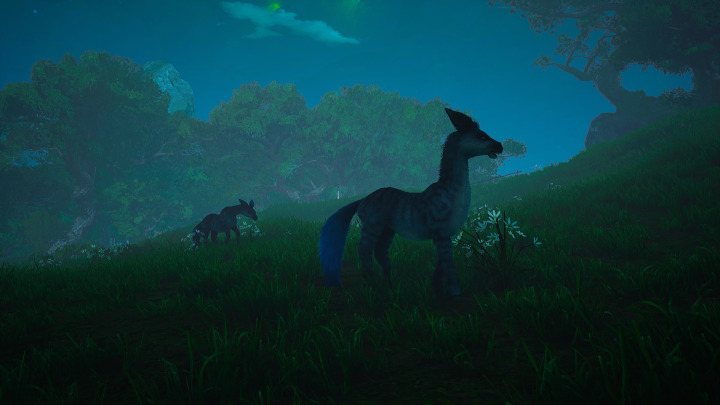
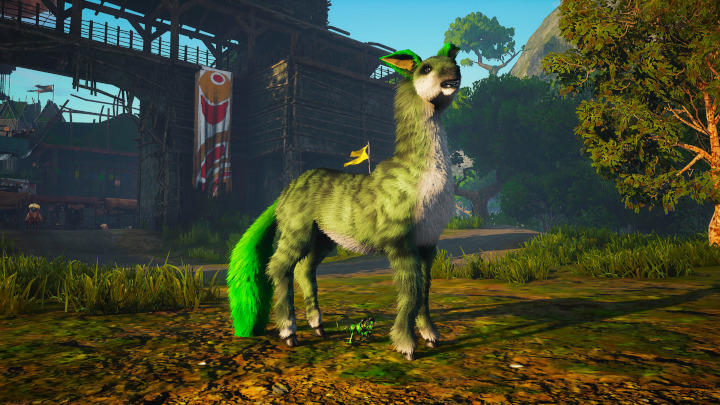
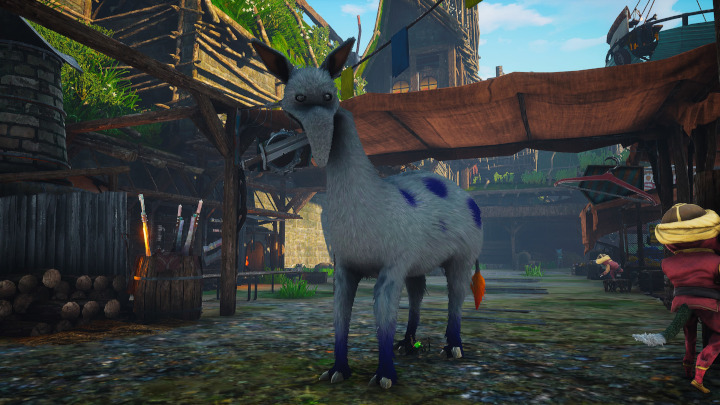
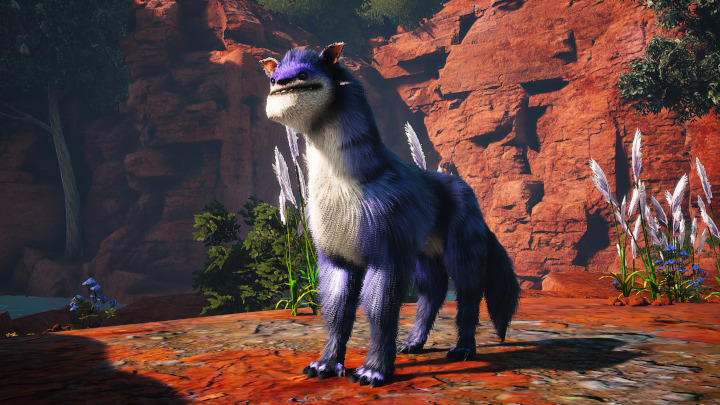
How to get the Amber Gnoat
The Amber Gnoat is for sale at the Vespidut Outpost, directly north of the Myriad Fortress. You’re looking for a vendor called the Livingthing Broker. The Livingthing Broker will sell you the Amber Gnoat for a pretty reasonable price.
Yes, this is just a color-swapped version of the Azure Gnoat, but it’s still cool to have.
How to get the Pea Gnoat
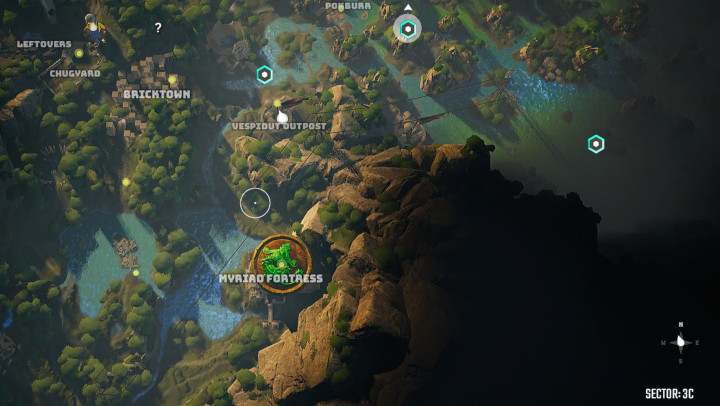
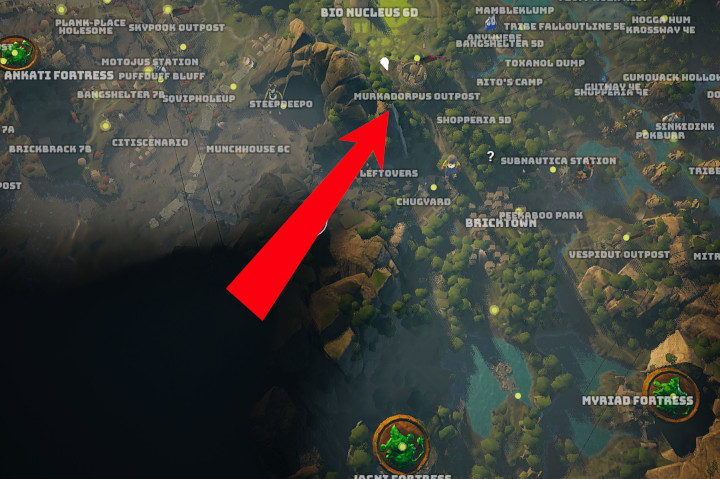
The Pea Gnoat is another color variant of the basic Azure Gnoat. It can be purchased from the Livingthing Broker at the Murkadorpus Outpost, just north of the Chugyard.
When I bought this particular mount, the certificate actually said it was for the Old Amber Gnoat, though it’s marked as the Pea Gnoat in my inventory. I’m guessing that’s just a typo in the item description.
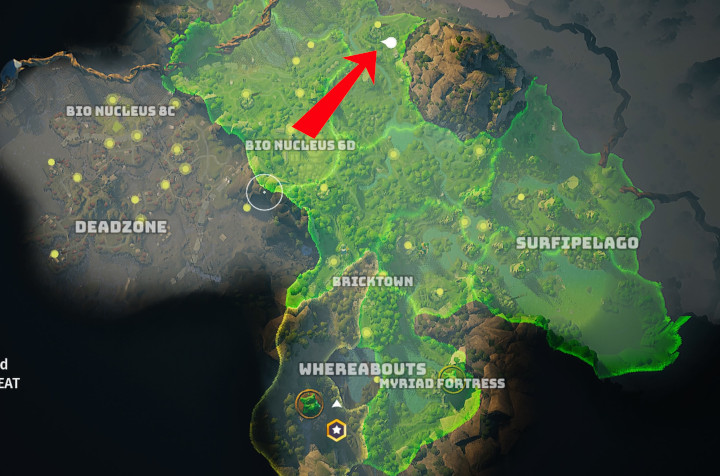
How to get the Pelago Gnoat
The Pelago Gnoat is a very cool-looking mount that you can buy from a vendor (like the Old Amber Gnoat). You’re looking for a village called Namby. Visit the Livingthing Broker in Namby to purchase the reasonably priced Pelago Gnoat.
Namby is northwest of Pingdish 6E, and northeast of Sknapptrutt Outpost. Check out the map above for the exact location.
If you want to tame your own, however, you can usually find some (as well as some pip fruit) in this area:
And you won’t even have to pay for it!
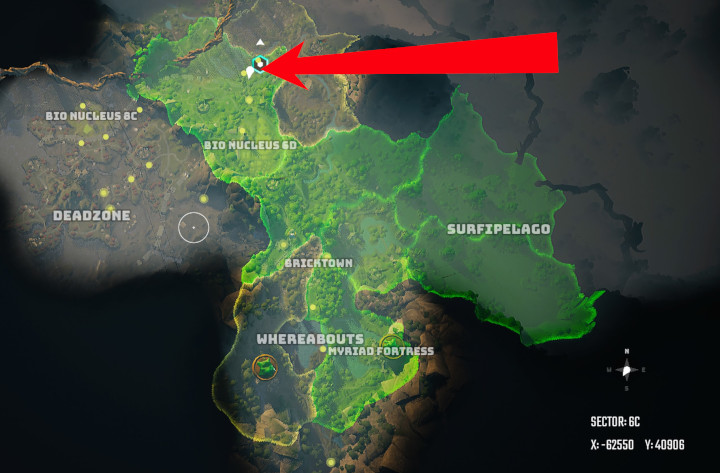
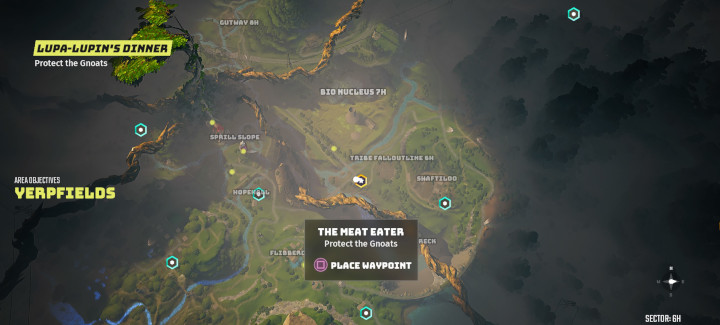
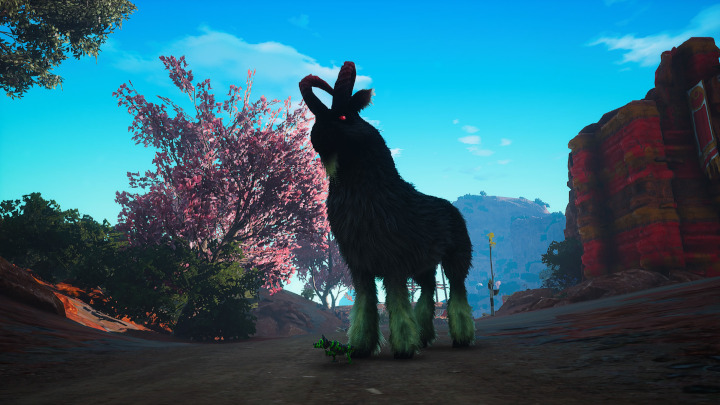
How to get the Putignoat
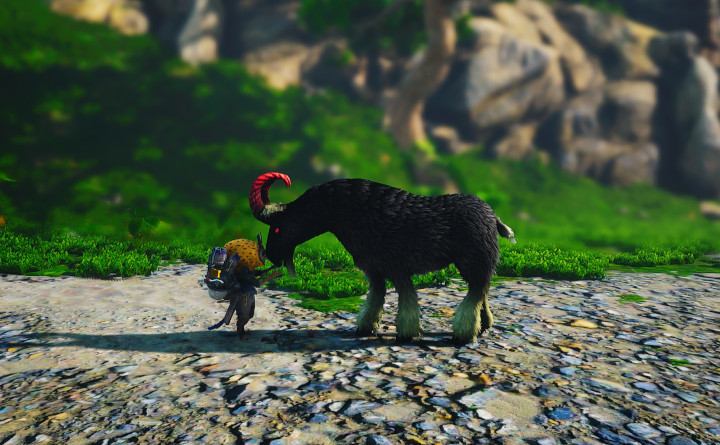
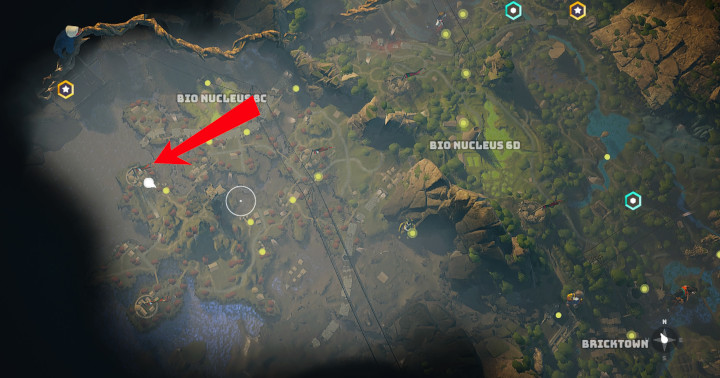
The Putignoat is a rare type of gnoat that has horns like a ram and red eyes. To acquire the Putignoat as your mount, you must complete a quest called The Meat-Eater. In this quest, you will protect the Putignoat from Lupa-Lupin.
The quest can be found just to the west of the S in Surfipelago on your map.
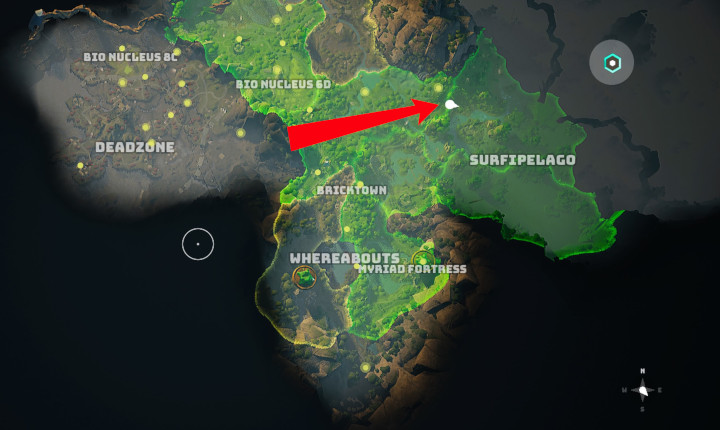
I’ve also seen it show up in this location:
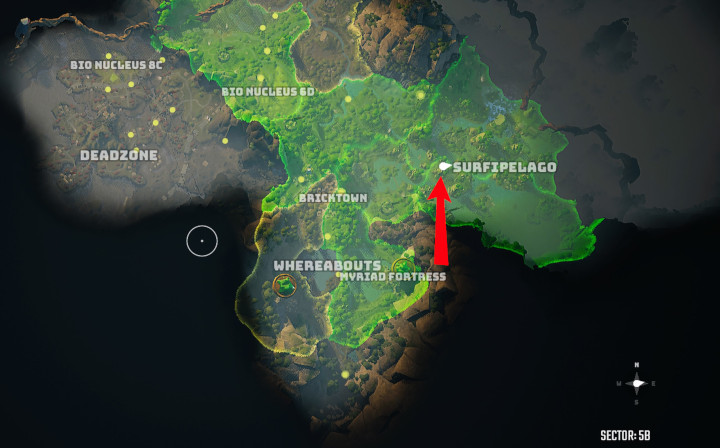
And I’ve also seen it pop here:
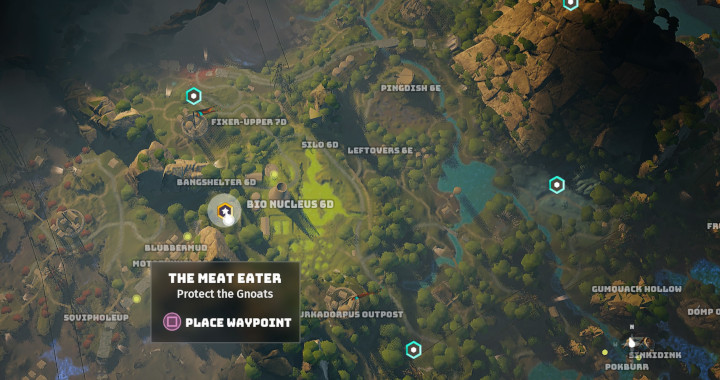
I believe this is part of the main story, so it should activate once you reach one of the appropriate locations. There will be a fight against Lupa-Lupin, and if you win, you will rescue the Putignoat. Once the fight is over, Lupa-Lupin will run off and you’ll acquire the Putignoat as a mount.
If you want to purchase one, however, you can do so at Wingo Outpost, way out on the western edge of the Deadzone.
You can also purchase one in the village of Bumlidof, due east of the Tree of Life.
You can also find them roaming about in the area to the east of Bumlidof, so if you can find some pips, you can score a free one. Perhaps they’re not so rare after all?
How to get the Turpturgel Gnoat
So, I think this is just the Putignoat with a different name — I haven’t been able to spot any difference in appearance between the two, so it might just be a weird thing that happened with the random name generator. It’s weird that this wouldn’t be called the _____ Putignoat.
Even so, I’ll post this one anyway in case anyone’s interested in picking it up. You can purchase the Turpturgel Gnoat at the Livingthing Broker at the Granito Outpost once you’ve claimed it for your tribe.
The Granito Outpost is way out on the eastern edge of the map, northeast of Surfipelago.
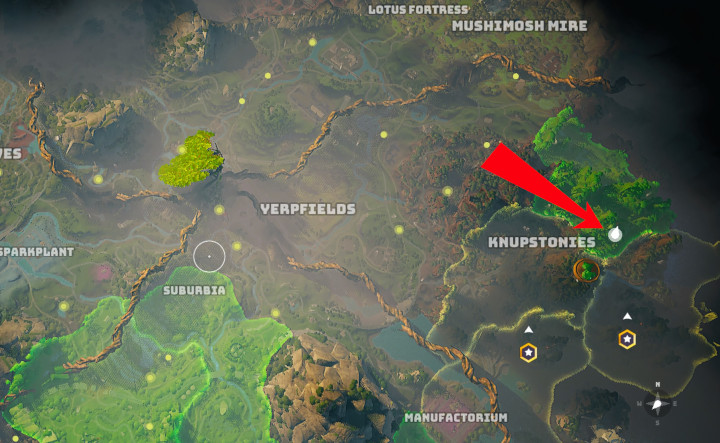
How to get the Scarlet Gnoat
The Scarlet Gnoat can be purchased at the Livingthing Broker at the Quirkquarp Outpost. You will have to take command of the outpost before the shops are available, but once you do the Scarlet Gnoat should be available for purchase.
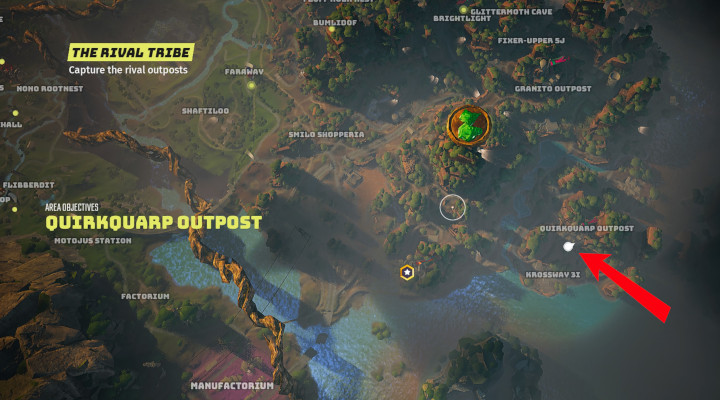
Quirkquarp Outpost is one that you’ll eventually claim as part of the Rival Tribe story quest. It’s to the south of Granito Outpost (shown in the previous section).
How to get the Yrpsnout
The Yrpsnout is a ridiculous creature that feels like it snarped its way out of a Dr. Seuss book. You can purchase one at the Livingthing Broker at Urfidurf Outpost.
If you chose the Myriad as you clan, you will have to conquer this outpost before you’re able to purchase a mount here.
If you don’t want to drop the cash, though, you might be able to find one roaming the hills outside the outpost. In fact, if you’re in the fields around the Tree of Life, you’ll probably spot several of these all over the place. They seem to be one of the most common mounts to find roaming the world.
How to get the Abo Gnoat
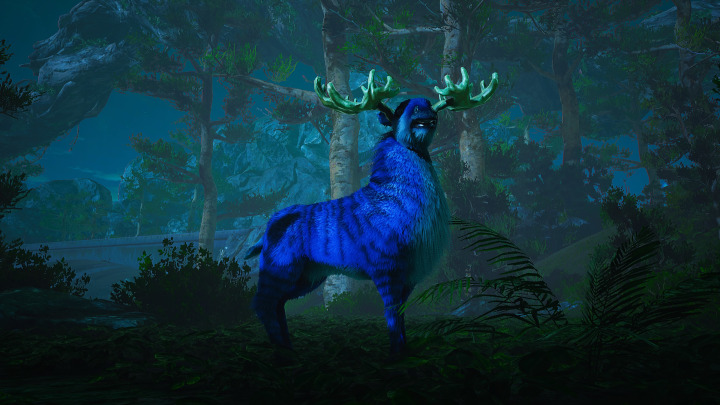
The Abo Gnoat is a majestic, mooselike creature that can be found in a forested area called Fnackyleaves. It’s directly west of the Tree of Life, near the western edge of the map.
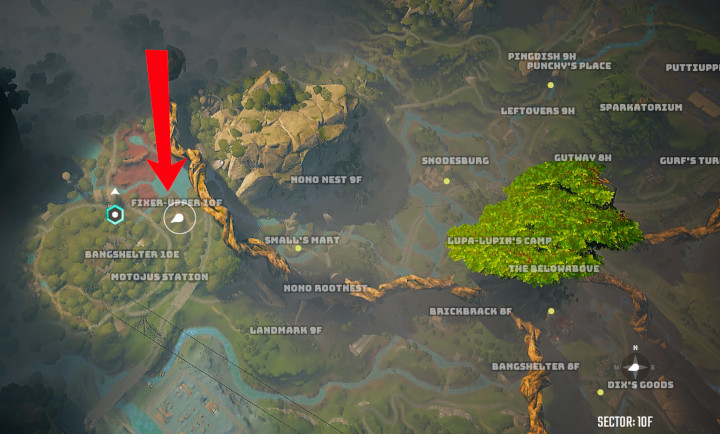
There are a couple Abo Gnoats in this area. The easiest one to find is right outside of Fixer-Upper 10F. And if you follow the road to the west, you should come across a pip bush along the side of the road.
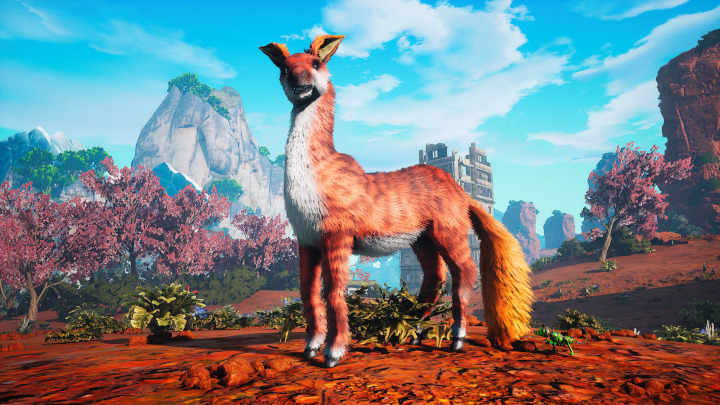
How to get the Snickels
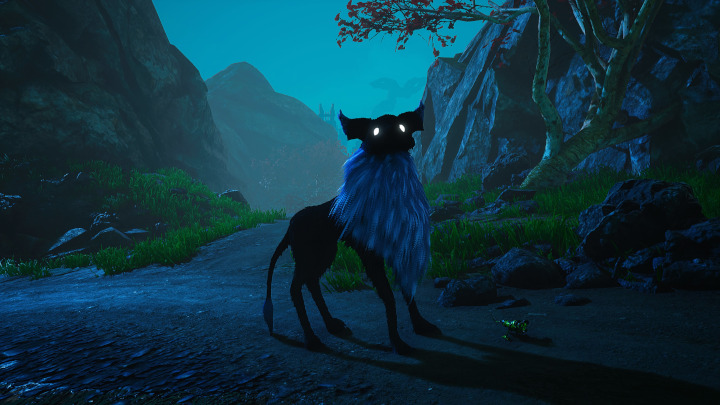
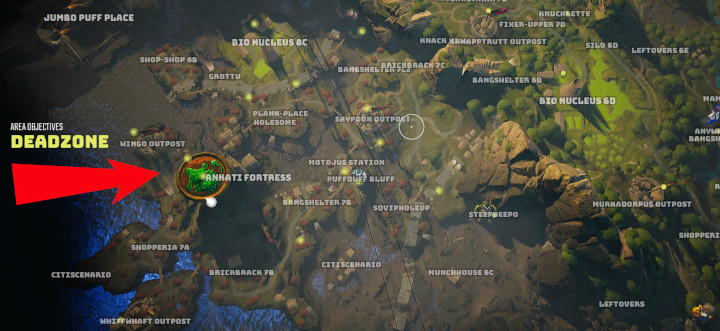
The Snickles is a sleek, foxlike mount that I think is particularly awesome-looking. You can purchase the Snickels at the Livingthing Broker in the Ankati Fortress once you’ve absorbed the Ankati into your own tribe.
How to get the Mubi

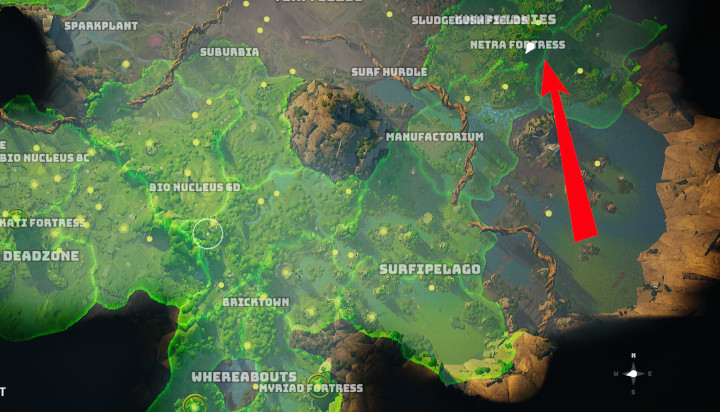
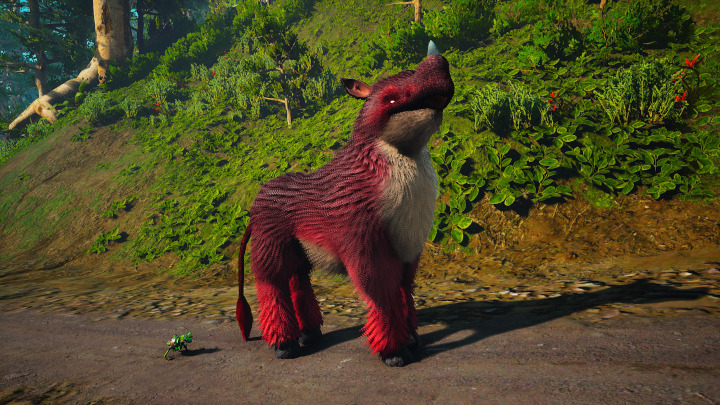
The Mubi is what would happen if you took the Snikels and cut off its mane (it lacks the glowing eyes too). The Mubi can be purchased from the Livingthing Broker at the Netra Fortress once you’ve absorbed the Netra clan into your own.
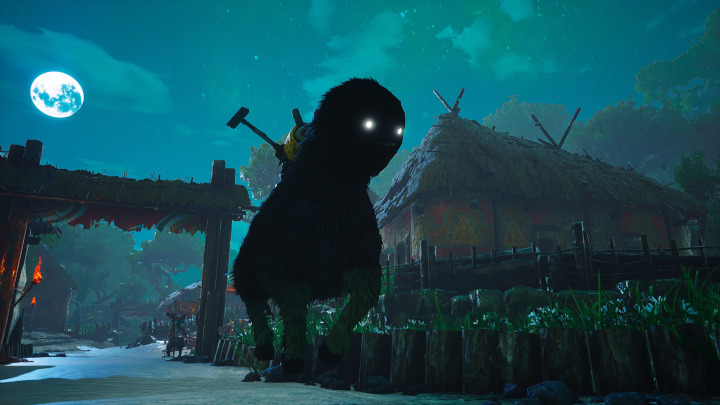
How to get the Bula Gnoat
The Bula Gnoat is a beefier mount that can be purchased from the Livingthing Broker in Underfoot Outpost. The outpost must be allied with your tribe first, of course.

The Underfoot Outpost is up in the northwest corner of the map, alongside the Tree of Life root and southeast of the Pichu Fortress.
If you have a Heatzone Suit, you could also go up to the Kluppy Dunes in the northernmost section of the map and check out a tiny little outpost called Bap Branch.
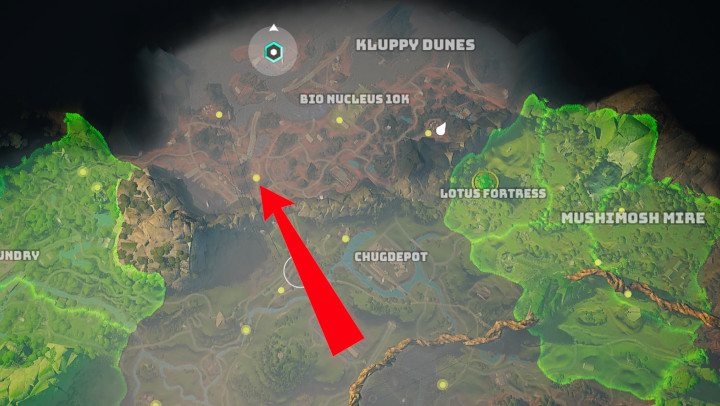
You can buy a Bula Gnoat here, or you could tame one. There are several wandering around this general area.
How to get the Batnam-Nam
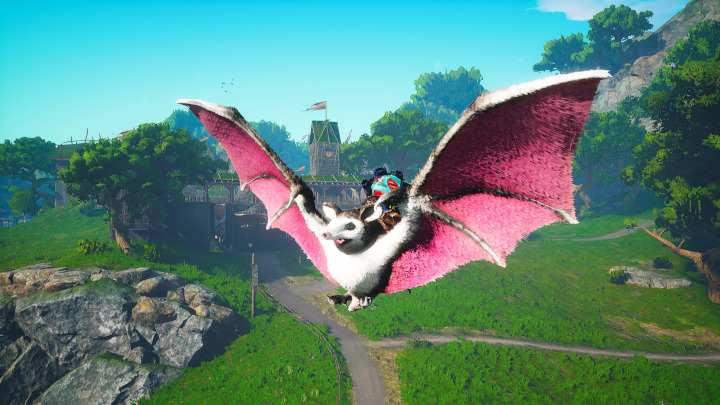
The Batnam-Nam is likely to be your first flying mount, though it’s more of a gliding mount than a true flying mount. It basically has a better version of the Automaton’s glide feature, and it can flap its wings to give you a little boost before gliding.
In order to acquire the Batnam-Nam, you’ll have to complete Pebble’s quest line. To trigger Pebble’s quest line, you’ll need to try to open something that requires a Klawbar upgrade. Pebble is your Klawbar upgrader. You can meet Pebble at Knack Hill.
Once you talk to Pebble, he’ll ask you to complete a series of tasks for him. The first task is to climb up three cliff faces. Each one will be marked on your map, so that when you finish one, the next one should be marked automatically.
Once you’ve completed all three cliff faces, return to Pebble to check in. He’ll ask you to now test out three of his ziplines. Once again, you’ll just have to follow the quest markers. Simply ride each zipline once to test it out, then return to Pebble to check in.
If you’ve been to the Ark, Pebble will ask you for a seat on it. No matter what you choose, he’ll leave you with a gift as a token of appreciation for helping him out. Of course, you’ll have to climb to the top of Knack Hill to claim it.
That gift, in case it’s not obvious by now, is the Batnam-Nam.
How to get Sol’s Trunk
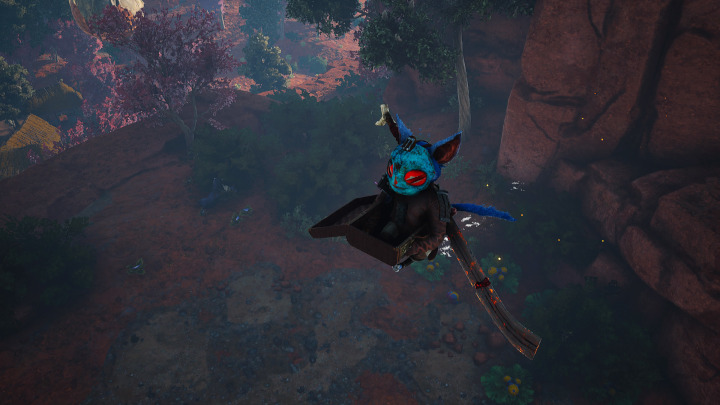
Sol’s Trunk is another gliding mount, though this one moves slightly upward rather than downward, so it will get you into places that the Batnam-Nam can’t reach.
Of course, to get it, you must first get to some places that are pretty hard to reach themselves.
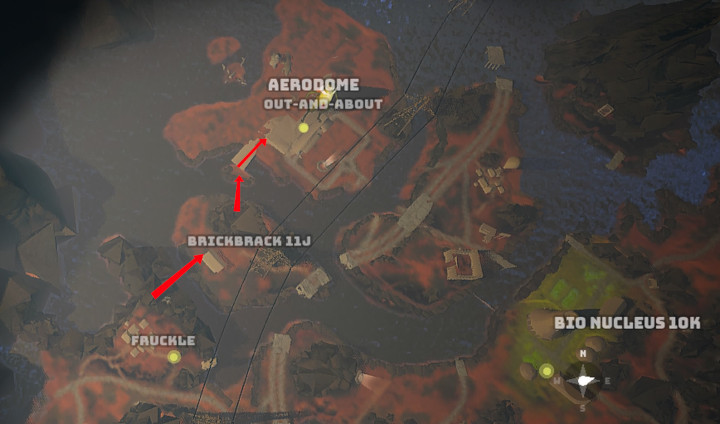
To begin Sol’s questline, you need to meet up with Sol in the Aerodome in the very northern part of the map. If you don’t have the Gullblimp (airship), you can still reach the Aerodome if you are clever and careful (and good at gliding, preferably with the Batnam-Nam).
You’ll start in Fruckle, then sail off a precarious cliffside onto an island. From there, you’ll have to sail off another precarious cliffside onto another island, which has a tightrope that will let you cross over to the island where you’ll find the Aerodome. I’ve marked the path on the map below.
Of course, if you have the Gullblimp, you can just fly it over there.
Once you get to Sol, he’ll ask you to gather three pages of a book for him. Follow the quest markers to where the pages are (you’ll have to fight some beasties first), then return the pages to Sol. After that, he’ll offer you his trunk, but you have to go pick it up from storage. Don’t worry, it should be marked on your map.
Grab the trunk, and it’s yours! Then you can bring it back to Sol to complete the quest. You can invite him to the Ark at this point as well.
To use Sol’s Trunk, you’ll need to have it equipped to your backpack slot.
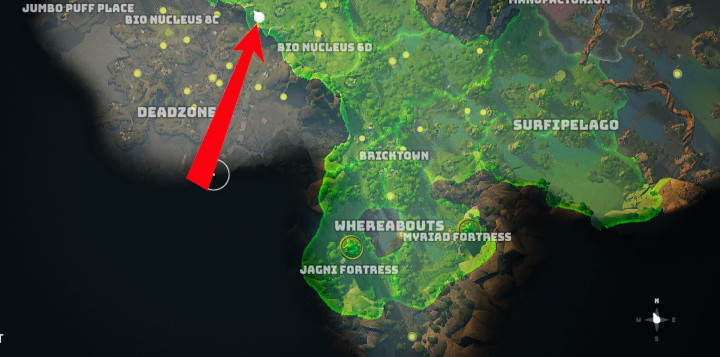
How to get the Helipack
The Helipack is another “gliding” vehicle that you wear on your back. To get it, you must meet up with Lobo at the Blimpstation in the Kluppy Dunes. Here’s where it is on your map:
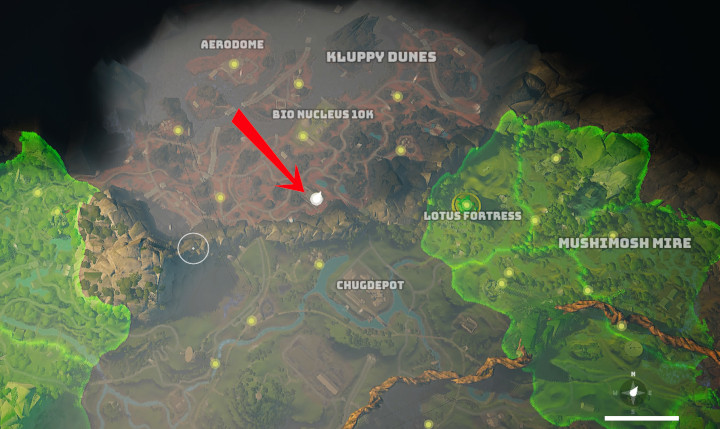
Once you find Lobo, she’ll ask you to find the Frankendog, which is a robotic dog that you can find way up at the top of the Sparkatorium. The Sparkatorium should be marked on your map, but it’s not far northeast of the Tree of Life, and directly south of End-of-the-Line.
Once you get to the Sparkatorium, you’re going to need to solve a puzzle to get the elevator working. And let me tell you, there are like two puzzles in the entire game that are kind of difficult, and this is one of them. You’ll need to match wires up to create the sequence of letters shown beneath the wires.
I’m posting my solution here:
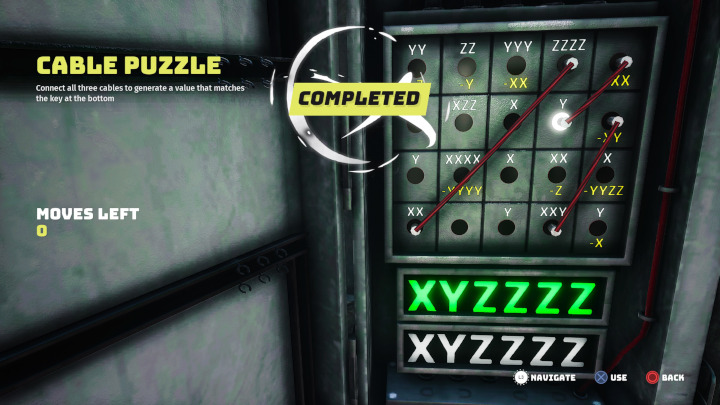
However, I’ve done this quest three times now, and it seems like the puzzle you get is randomized. Your elevator puzzle might end up being a different one (in which case I can’t really help you, though the one I’ve posted above was definitely the hardest of the three I’ve encountered).
Once you solve the puzzle, you can ride the elevator to the top of the Sparkatorium, where you’ll find the Frankendog. When you bring the Frankendog back to Lobo, she’ll gift you the Helipack. Unfortunately, you won’t get the Frankendog as a mount.
To use the Helipack, you’ll need to have it equipped to your backpack slot.
Now, I’ve tested the Helipack against Sol’s Trunk, and Sol’s Trunk will give you more distance (almost twice as much) and more height, making it the better backpack option. I also think Sol’s Trunk is more fun to use, but that’s just a personal preference.
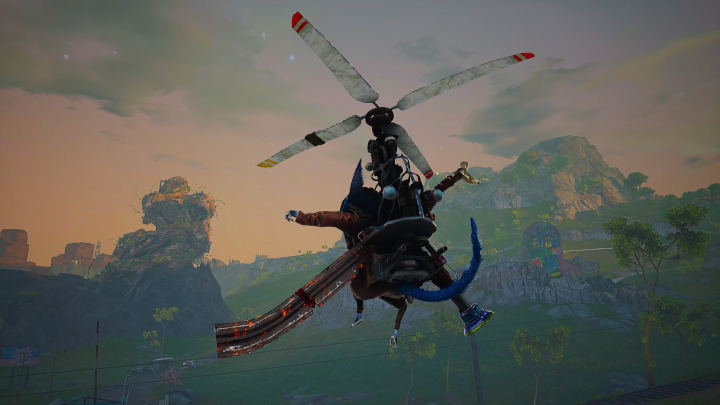
How to get the Gullblimp
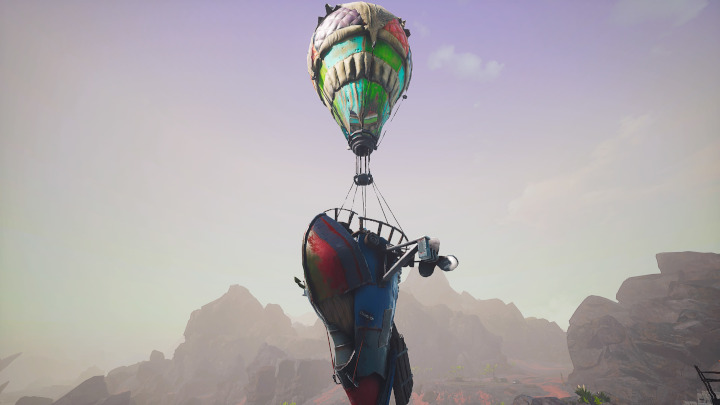
The Gullblimp is a flying vehicle, making it the best mode of transport in the game. It will get you into places that are otherwise difficult to reach, making it an incredibly valuable vehicle for exploration. The bad news, however, is that it can only be used in the Kluppy Dunes.
Yeah, I know…
In order to get the Gullblimp, you’ll first need to go through the process of acquiring the Helipack, which I’ve walked through in the previous section. Once Lobo gifts you the Helipack, she’ll ask you to find an anchor so you can weigh down the Gullblimp.
The anchor is actually closer than you might expect (no need to travel all the way out to the Surfipelago), since there’s a sunken ship sticking out of the goo to the north of the Blimpstation. Of course, before you pull up the anchor, you’ll need to solve a puzzle. I forgot to take a screenshot of the solution, but I really don’t think you’ll need it. Turn the knobs, matching white to white and orange to orange.
Bring the anchor back to Lobo, and she’ll let you take the Gullblimp for a ride. It should now be summonable whenever you’re in the Kluppy Dunes.
How to get the Mekamjut
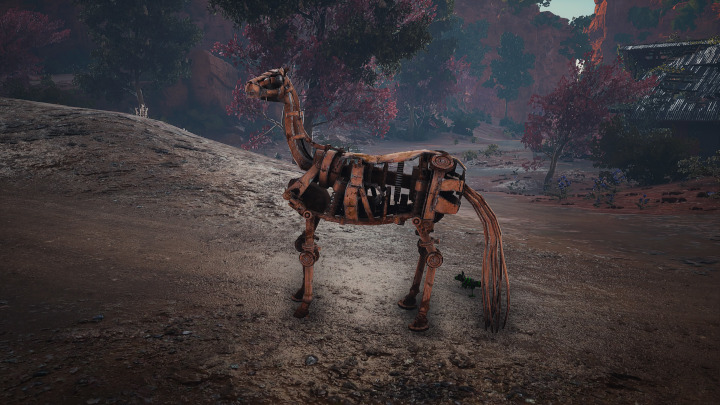
After you’ve taken down the first Worldeater, you’ll need to report back to Out-of-Date. He’ll tell you to go seek out Noko, a Gnoatgroomer (as in, she tames Gnoats). She spends her time at a location called Gnoat Pen, way to the east of the Tree of Life.
Note that you don’t need to talk to Out-of-Date first. As long as you know where Noko is, you can just start all this before you do anything else in the game if you really want to. And if you don’t know where she is, I made a little map for you.
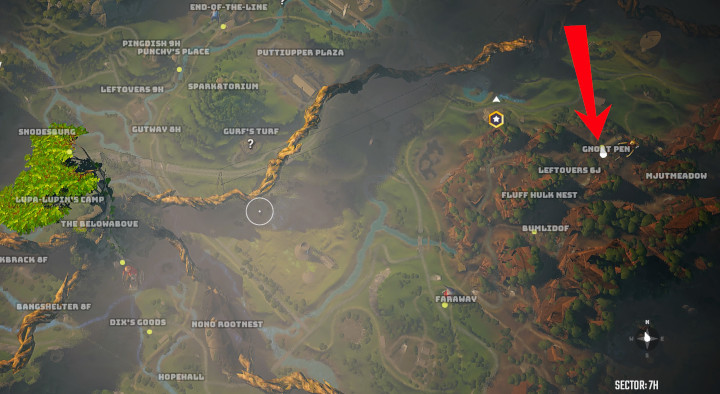
Once you talk to Noko, she’ll send you on a quest to find her Mjut down by the Mjutmeadow (which is to the east of Gnoat Pen). Once you find the Mjut, you’ll walk it back to Gnoat Pen while fending off monster attacks. When you return to Noko, she’ll point out that the Mjut is a bit freaked out. You’ll need to calm it by feeding it a Bon-Bon Gummy.
This errand sends you out to Krossway 7J, which is northwest of Gnoat Pen. When you get there, you need to find this building:
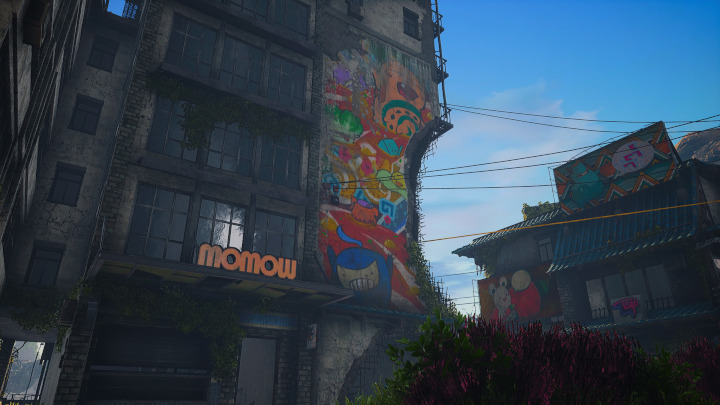
It has a sign that says “Momow” on the front of it. Enter this building, then go upstairs, and you should be able to access a tightrope that leads to the next building over. From that building, you can ride the zipline down to the building where the Bon-Bon Gummy actually is. Once you pick up the Bon-Bon Gummy, bring it back to Noko.
No, you’re not done yet.
Next, Noko will ask you to get a sit-tight, or a saddle. For that, you need to go find the Mekamjut at the Smilo Shopperia (which is south of Bumlidof). When you get inside the shopperia, you’ll see that your path is blocked by a garage-style door. If you look closely, you’ll see a wire coming off of it. Follow the wire to a fusebox puzzle, and solve the puzzle to activate the door. Here’s the solution, in case you need it:
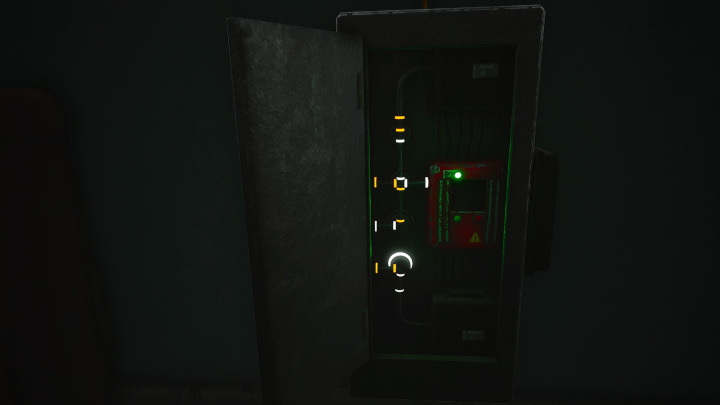
If you do need this solution, please tell me in the comments how you managed to get this far into the game without figuring out how to solve these puzzles. I really want to know.
Anyway, go back upstairs and the door should be open. Inside, you’ll find the Mekamajut. You’ll need to solve another puzzle in order to remove the saddle.
Yeah, this puzzle is even easier than the fusebox. Just match white to white and yellow to yellow.
This will let you pick up the saddle, but don’t go anywhere yet. You can now ride the Mekamjut, which will add it to your mount inventory.
How to get the Mjut
Once you’ve acquired the Mekamjut (see the previous section for all those details), you can return to Noko with the saddle. The actual, living Mjut is ready to ride at this point (or so Noko says), but it’s not yours yet. Now you have to chase down some Glittermoths.
First, you’ll have to find Mito, who has a stall set up just south of Mjutmeadow in a place called Brightlight. He’ll ramble a bit about light and darkness, then he’ll tell you to go to Glittermoth Cave (or Glittermoth Grove), which is to the east of Brightlight.
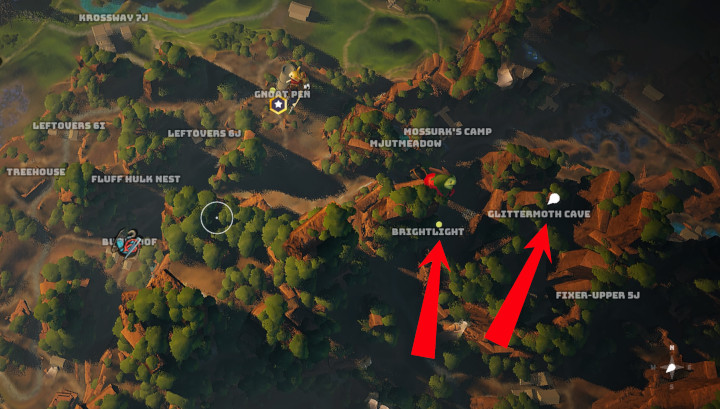
There is a trick to finding Glittermoth Cave: You’ll need to approach it by rope. You’re looking for this set of cliffs:

It’s really easy to miss, but the telltale sign that you’ve found the right place is that you’ll see splotches of yellow paint on the side of the cliff (look carefully).
You can climb up the left side (where you see the yellow paint splatters), then walk the tightrope across the gorge. From here, Glittermoth Cave is a straight shot. Once you arrive, you’ll need to catch five Glittermoths with your net. You can do so by approaching them and pressing the Interact button (triangle on PS4).
Bring the Glittermoths back to Noko and you’ll finally be able to use the Mjut (and you can invite Noko to join the Ark at this point too, so long as you’ve talked to Out-of-Date).
The thing that makes the Mjut different from the Gnoat mounts is that you can break open cave openings (like the one shown above) using a tow rope.
How to get the Mekafingro
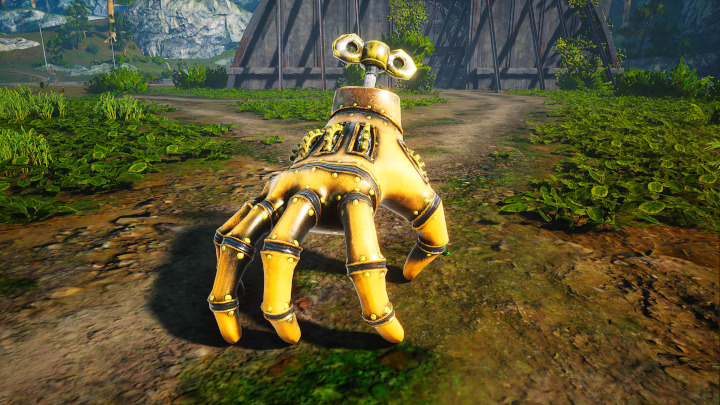
The Mekafingro is a mechanical hand that’s actually awesome to use. It even has it’s own gun (the animation for the Mekafingro’s gun is absolutely incredible).
Once you’ve defeated two Worldeaters, check in with Out-of-Date. He’ll send you off to see Whiz at Surgesurf Factory in the northeastern part of the map, really close to the northeastern Worldeater, and just south of Pichu Fortress.
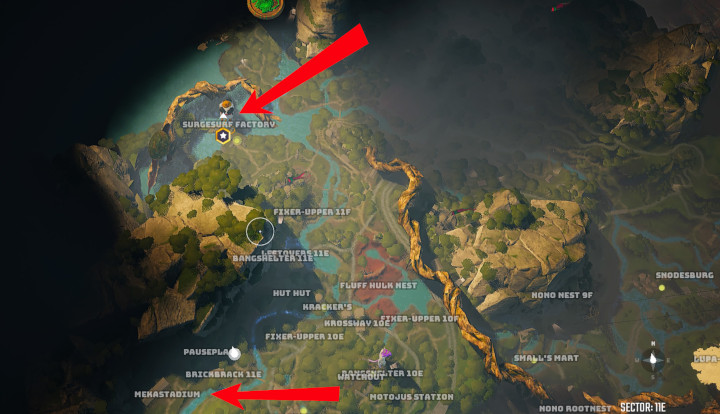
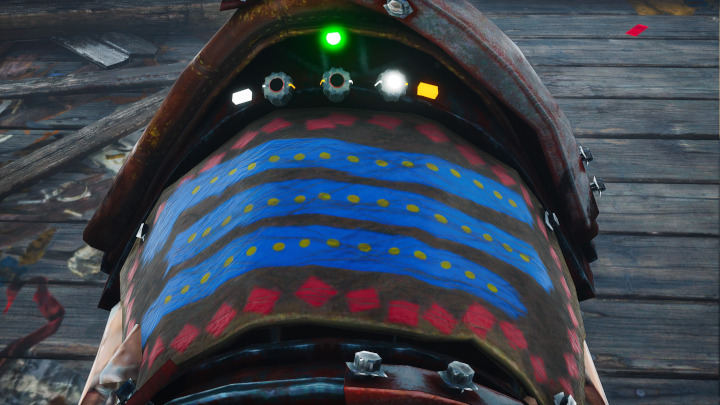
Once you visit Whiz, he’ll send you on a mission to retrieve the Mekafingro for him. You’ll need to go to Mekastadium to find it. It shouldn’t be hard to find, but you will have to solve a puzzle to activate it. If you need the solution, here it is:
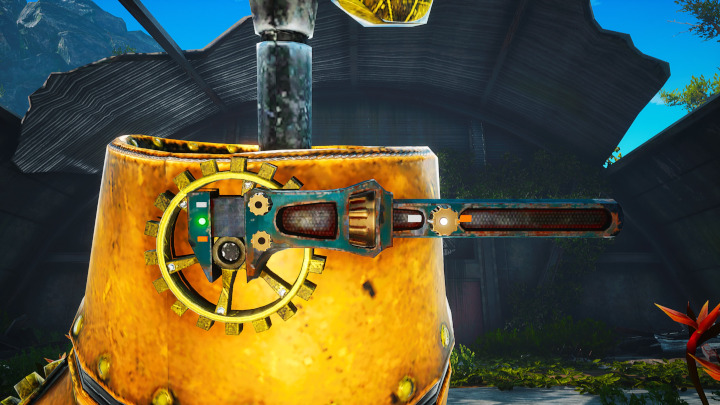
It’s kind of hard to see in the image above (and even in the game), but this is another case where you have to simply match orange with orange and white with white.
Once you’ve solved the puzzle, the Mekafingro is yours.
How to get the Octopod
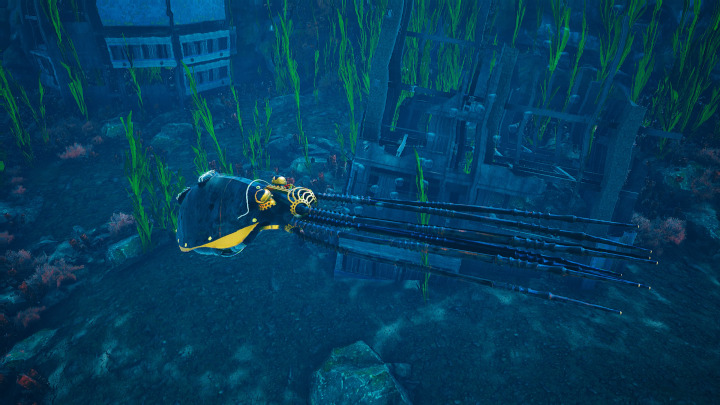
The Octopod is a submarine you’ll use to confront the final Worldeater. To get it, you’ll have to follow the instructions for the Mekafingro above, then continue with Whiz’s requests. It’s the same stuff you’ve come to expect — get some stuff to repair the Octopod, then get some critters to use as ammo.
Once you’re ready to face the fourth Worldeater, you’ll go for a ride in the Octopod.
Note that unlike the previous three Worldeater questlines, you don’t actually get to keep the Octopod — this one is exclusively for getting you to the Worldeater. But at least you get the Mekafingro as a consolation prize.
And once you complete all this, you should be able to invite Whiz aboard the Ark.
How to get the Pee-Wee Gargantua
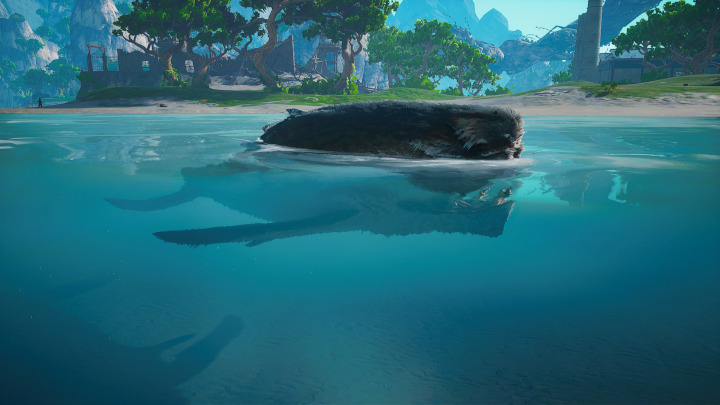
Once you’ve gotten the Octopod prepared for the Worldeater fight, you’ll want to go back to Gill (the sailor-looking critter who helped you find the Guppos for the Octopod). He’ll have another request for you: Go free a captive aquatic creature. That creature is the Pee-Wee Gargantua, and it’s strung up in a camp in the Surfipelago. If you set it free, you will get it as a mount (just follow the quest markers and you should be golden).
Gill is another recruitable character for your Ark crew.
How to summon your mount/vehicle
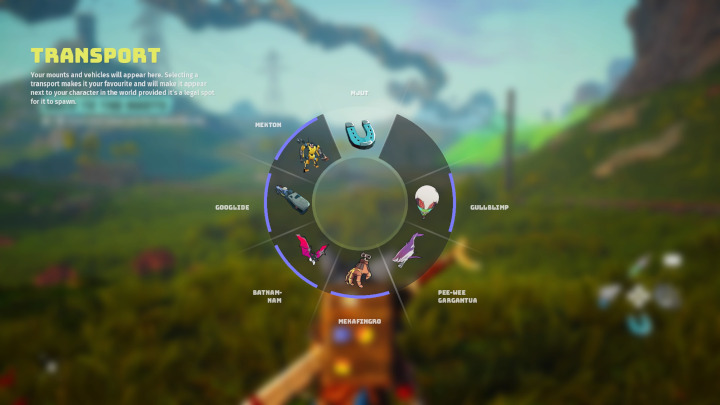
You can summon your mount in any eligible location by pressing down on the D-pad. This will open up a wheel that lets you choose which mount or vehicle you want to summon.
Most of your mounts are under the horseshoe icon, which is at the top of the wheel. If you want to swap out the default mount, go to the world map, then press L1 or R1 (if you’re using a PlayStation controller) to cycle through your options to the Transport section of the menu.

Here, you can choose which mount will be summoned by default.
And that’s pretty much everything you need to know about mounts in Biomutant!
But, the one extra slot on the mount wheel?
I’ve not found anything that fills that slot. I’m not sure if they left it open in case they wanted to add something later on with DLC, or if there’s some super-secret mount that people haven’t discovered yet. I’m guessing the former rather than the latter.
Wouldn’t it be for the Octopod..?
You only get the Octopod for the one boss fight. You don’t get to keep it.
What about the mechanical dog